Instructions for Using Menu-driven
Axis Control Software for the
SDSS 2.5-meter Telescope
Sloan Digital Sky Survey Telescope Technical Note 19980624
Charlie Briegel
The following steps will aid in controlling all three axes of telescope
motion control system through direct access into the Motion Control Processor
(MCP).
-
Login into sdssmcp by executing one of the following:
a. telnet into port server - telnet t-g-sdds-2 -3700; enables
a telnet into the processor to take over control.
b. telnet into vxWorks processor - telnet sdssmcp; prevents a
telnet into the port server to take control.
Note that only one login is allowed at a time.
-
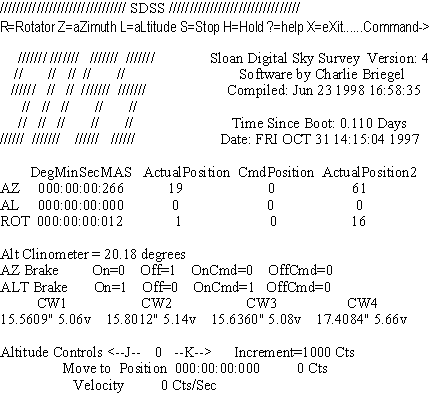
At the MCP-> prompt, type Menu.
-
The following screen will be displayed:

-
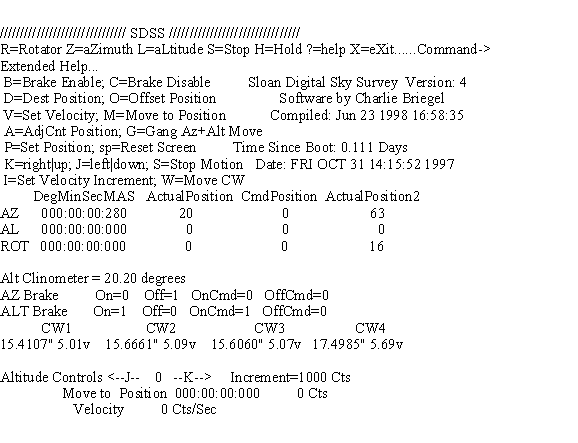
Type ? for help and the extended help screen will be displayed as
below:

-
IMPORTANT: If the processor needs to be rebooted, one of the telescope
emergency stop buttons should be pushed to prevent stray DAC voltages from
energizing the amplifiers. There is a solution, but it is not connected
at this time.
-
Select the axis of choice: z for Az, l for Alt, or r
for Rot. Then use j or k to move. Use i to change
the increment value.
-
The rotator uses the tachometer as feedback and the setting is in velocity
of the tachometer. The tachometer is clipped at +/- 2000. Altitude and
azimuth axes use position feedback and the setting is in counts per second
times 10. The positional change is clipped at +/-50000 counts per second.
-
Use h to hold a position. Either the motion will start with a velocity
of zero or the motion will decelerate to zero. The brakes can be on at
the time of this command, but as soon as the velocity is increased or decreased
the brakes for the corresponding axis must be off. This command only applies
to the azimuth and altitude axis.
-
Use s to stop. In all cases the closed loop is turned off since
the motion is in velocity and not to a given position. The position may
move after the motion is stopped since nothing is actively holding it.
-
Use p to set a position for the selected axis. After typing p, specify
the position in the same form as the display such as 1:2:3:4 for 1 degree,
2 minutes, 3 arcseconds, 4 milli-arcseconds. The position will be reset
for the corresponding specified position.
-
Use b to set the brakes and use c to clear the brakes for
the corresponding axis, either azimuth or altitude. The axis must be either
stopped or at zero velocity from the hold command or returning the velocity
to zero.
-
Use v to set the velocity for the corresponding axis; either azimuth
or altitude. The move or gang move command utilizes this parameter.
-
Use d to set the absolute position destination in deg:min:sec:mas
for the corresponding axis; either azimuth or altitude. The move or gang
move command utilizes this parameter.
-
Use o to set the relative position destination in deg:min:sec:mas
for the corresponding axis; either azimuth or altitude. The move or gang
move command utilizes this parameter.
-
Use a to set the absolute position destination in encoder counts
for the corresponding axis; either azimuth or altitude. The move or gang
move command utilizes this parameter. This is primarily useful for testing.
-
Use m to move to the previously specified position and velocity
for the corresponding axis; either azimuth or altitude. The position will
continue to be maintained until a stop command is issued.
-
Use g to move to the previously specified position and velocity
for both the azimuth and altitude axis. These positions will continue to
be maintained until a stop command is issued. Both movements will occur
simultaneously.
-
Use w to move all counterweights to the position for the specified
instrument. The positions are specified in software outside of the Menu
program.
-
!, @, #, and $ are used to move corresponding
1, 2, 3, and 4 counterweight motors to a specified position in inches.
% is used to stop counterweight motion.
-
t is for engineering use only to capture the motion parameters selected.
-
Press the spacebar to reset the display.
Questions regarding this note should be addressed to Charlie Briegel phone at (630) 840-4510 or by e-mail at briegel@fnal.gov.
Last modified 03/09/99
boroski@fnal.gov

